virtual try on earrings
Virtual Try on Earrings: How It Works and What to Check
Learn how virtual try on earrings works, from ear detection and scale to AI studio vs AR try-on, plus tips for accurate earring images.
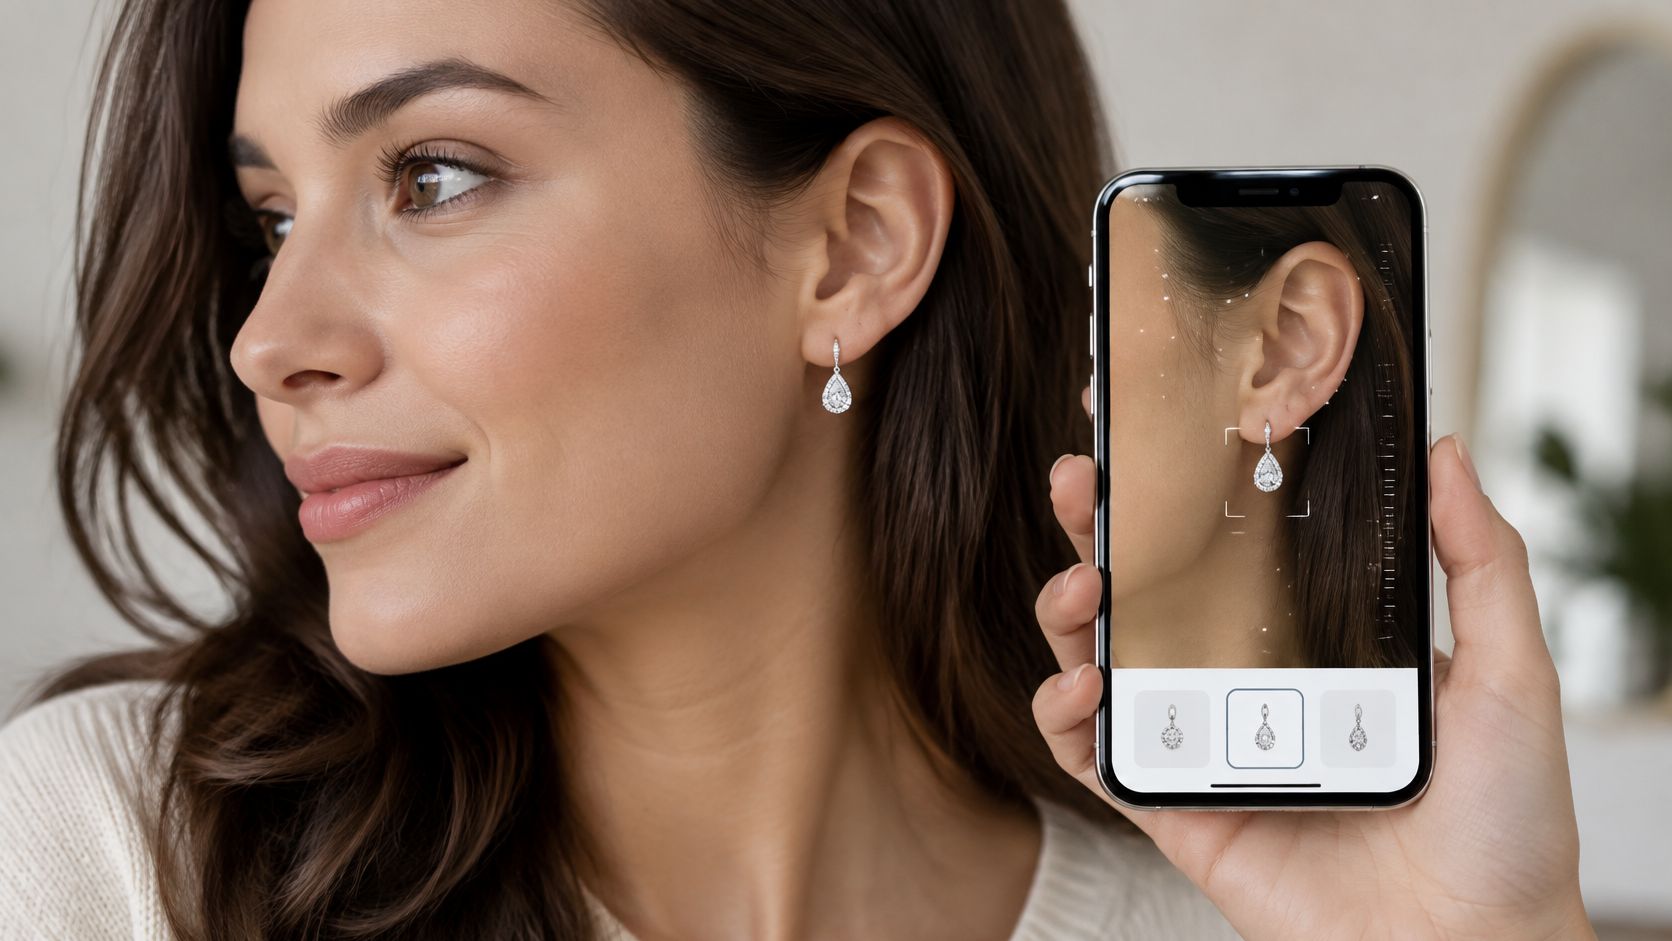
You're looking at a pair of drop earrings on your phone. The product photo is beautiful, but it doesn't answer the only question that matters. Will they look too long on you, too small, or just right against your jawline?
That's the gap virtual try on earrings is meant to close. It can help you judge style, color and rough proportion before you buy. What it can't do on its own is prove exact size, movement, comfort or piercing fit. This guide explains how the technology works, where it breaks down, and what to check so a convincing preview doesn't mislead you.
Table of Contents
- Photo-Based AI Studio and AR Live Try-On Compared
- How Ear Detection and Anchoring Work
- Why Distance, Angle and Lighting Limit Accuracy
- Size, Motion and Fit Are What Shoppers Need
- How to Prepare Accurate Earring Assets
- Common Try-On Problems and How to Fix Them
- Confirm Your Try-On Setup Before You Launch
Photo-Based AI Studio and AR Live Try-On Compared
A shopper holds a phone up, turns her head, and watches a drop earring swing beside her cheek in real time. Across town, a brand team takes the same earring and builds it into twenty clean product images overnight, without booking a studio. Both are called virtual try on earrings, but they solve different problems.
Photo-based AI studio tools start with still images. You supply one photo of a person and one product image, and the system composes a finished result you can reuse on a product page or in a campaign. AR live try-on starts with a camera feed. It tracks your ear as you move, so you can preview styles on yourself while you're still deciding.
| Criterion | Photo-based AI studio | AR live try-on |
|---|---|---|
| Input | One person photo and one product image | Live camera feed from a phone or laptop |
| Ear detection | Done per generated image, placement is composed once | Tracked continuously as the head moves |
| Scale control | Calibrated product dimensions and framing set the size | Camera distance, calibration and face size in frame set the size |
| Best use | Product pages, campaign images, catalogue sets | Shopper self-preview during comparison |
| Main risk | Convincing image that misstates size or motion | Jitter, poor lighting or lost tracking at distance |
The trade-off is control versus immediacy. A studio workflow, like the approach described in this guide to an AI photo studio, gives you repeatable images with consistent lighting and framing. You can approve each result before anyone sees it. A live preview gives the shopper a personal check in the moment, but its quality rises and falls with her camera, room and head angle.
Neither approach rescues poor earring data. If the product image is cropped, the dimensions are guessed, or the attachment point is wrong, both methods will place the wrong thing in the wrong place. One will do it in a polished still, the other will do it in motion. That's why the mechanics underneath matter more than the label on the tool.
How Ear Detection and Anchoring Work
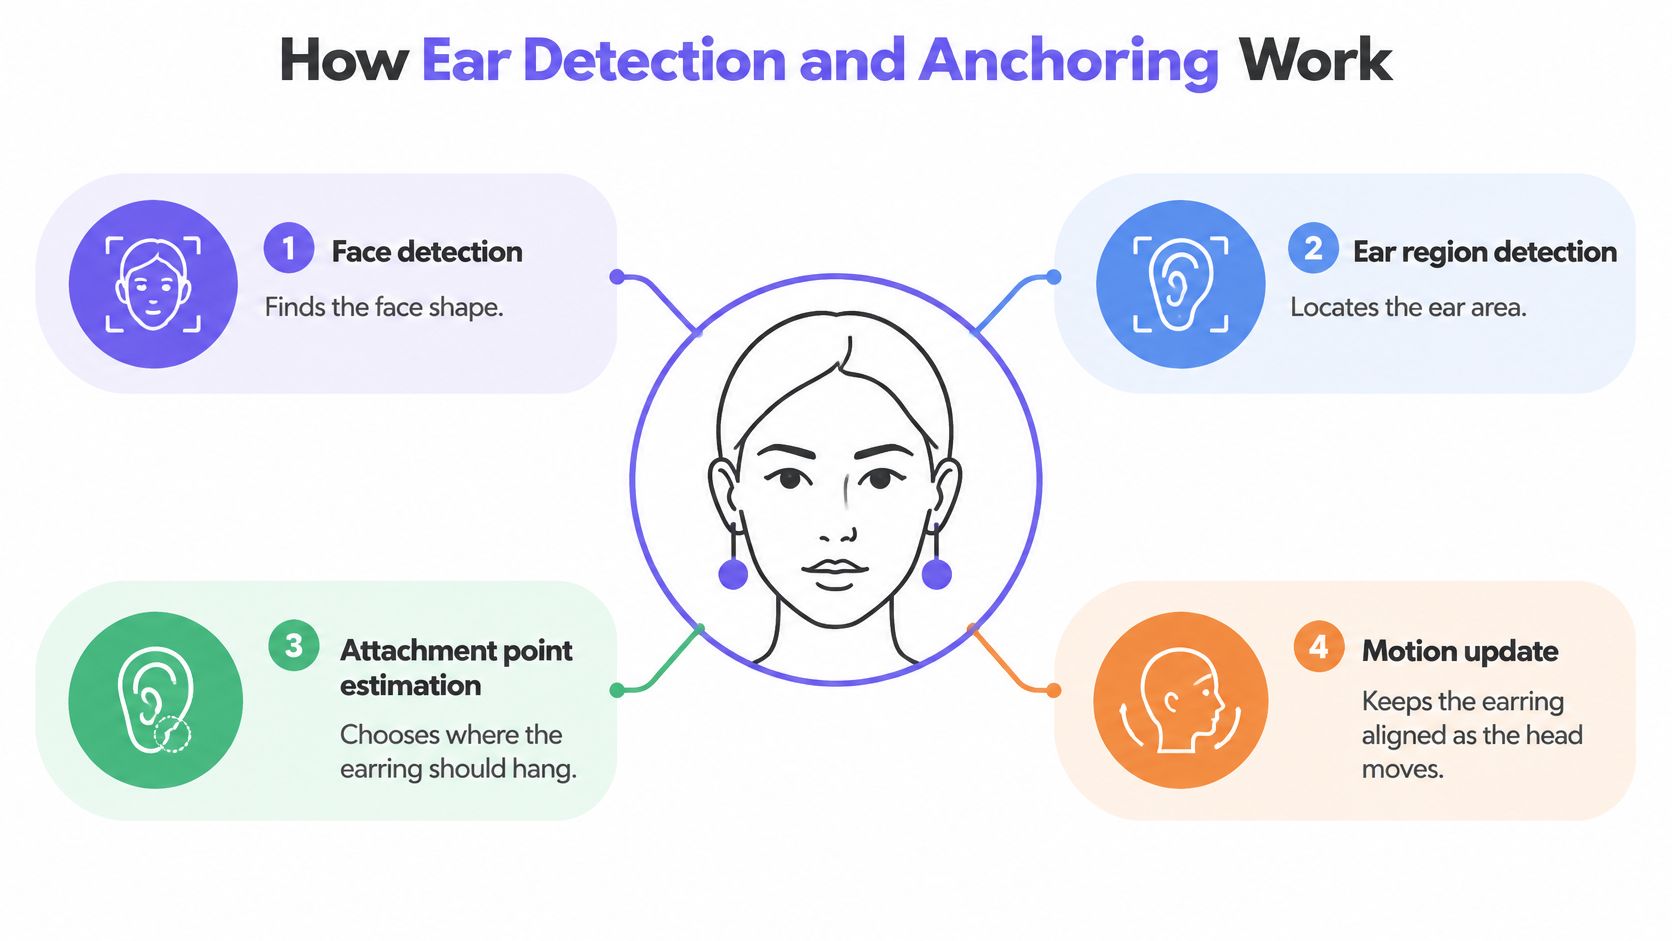
Earring try-on isn't a flat sticker pasted near a cheek. It's a tracking problem. The system finds the face, locates the ear region, estimates where an earring should attach, and updates that position frame by frame as the head moves.
A research implementation of real-time jewelry try-on confirms that facial landmarks can drive three-dimensional earring placement in live camera streams, while noting practical limits around tracking and implementation complexity. In plain terms, the software needs a moving map of the face, not a single coordinate.
The four steps work as a chain, and a weak link shows up immediately on a small object like an earring.
The Anchor Is Different for Every Style
Think of a stud as a pin pushed through fabric. It sits at one contact point on the lobe and barely moves. A drop is a pendulum hung from a hook. It starts at the piercing, extends downward by its length, and should swing from that top point.
Practical rule: Every earring needs its own anchor, set at its attachment point, with its own orientation and pivot. Sharing one generic origin across styles guarantees drift.
- Studs: The anchor is the lobe contact point. The visible face of the stud sits centered on that point, so even a small offset makes it look glued to the cheek.
- Hoops: The anchor is the piercing point at the top of the circle. The recorded diameter defines the footprint below and beside the lobe.
- Drops: The anchor is the hook or post at the top. Length is measured downward from there, and rotation should happen around that pivot, not around the middle of the piece.
Why Occlusion and Depth Matter
When you turn your head, your ear, hair and jaw should sometimes hide part of the earring. That's occlusion. Without depth information, the renderer doesn't know what's in front, so an earring stays fully visible through hair or on the far side of the head.
A credible anchor therefore carries more than an x and y position. It needs position, orientation and product-specific pivot metadata, plus real-world dimensions and a note on what should occlude the piece. A stud, hoop and drop shouldn't share the same origin because their visual center and extension from the lobe are different.
Use one center-image anchor for everything and you'll see the classic faults. Studs float. Hoops rotate around their middle instead of hanging. Drops detach from the lobe when the head tilts. The earring didn't fail. Its anchor was never taught where it attaches.
Why Distance, Angle and Lighting Limit Accuracy
Earrings are a hard test for a camera. They're small, often shiny, and they sit on a part of the face that disappears at a profile angle. If the ear is described by only a handful of pixels, a landmark error of a few pixels moves the whole earring visibly.
The image below shows the guided setup better tools aim for, with the face framed close enough for the ear to be read clearly.
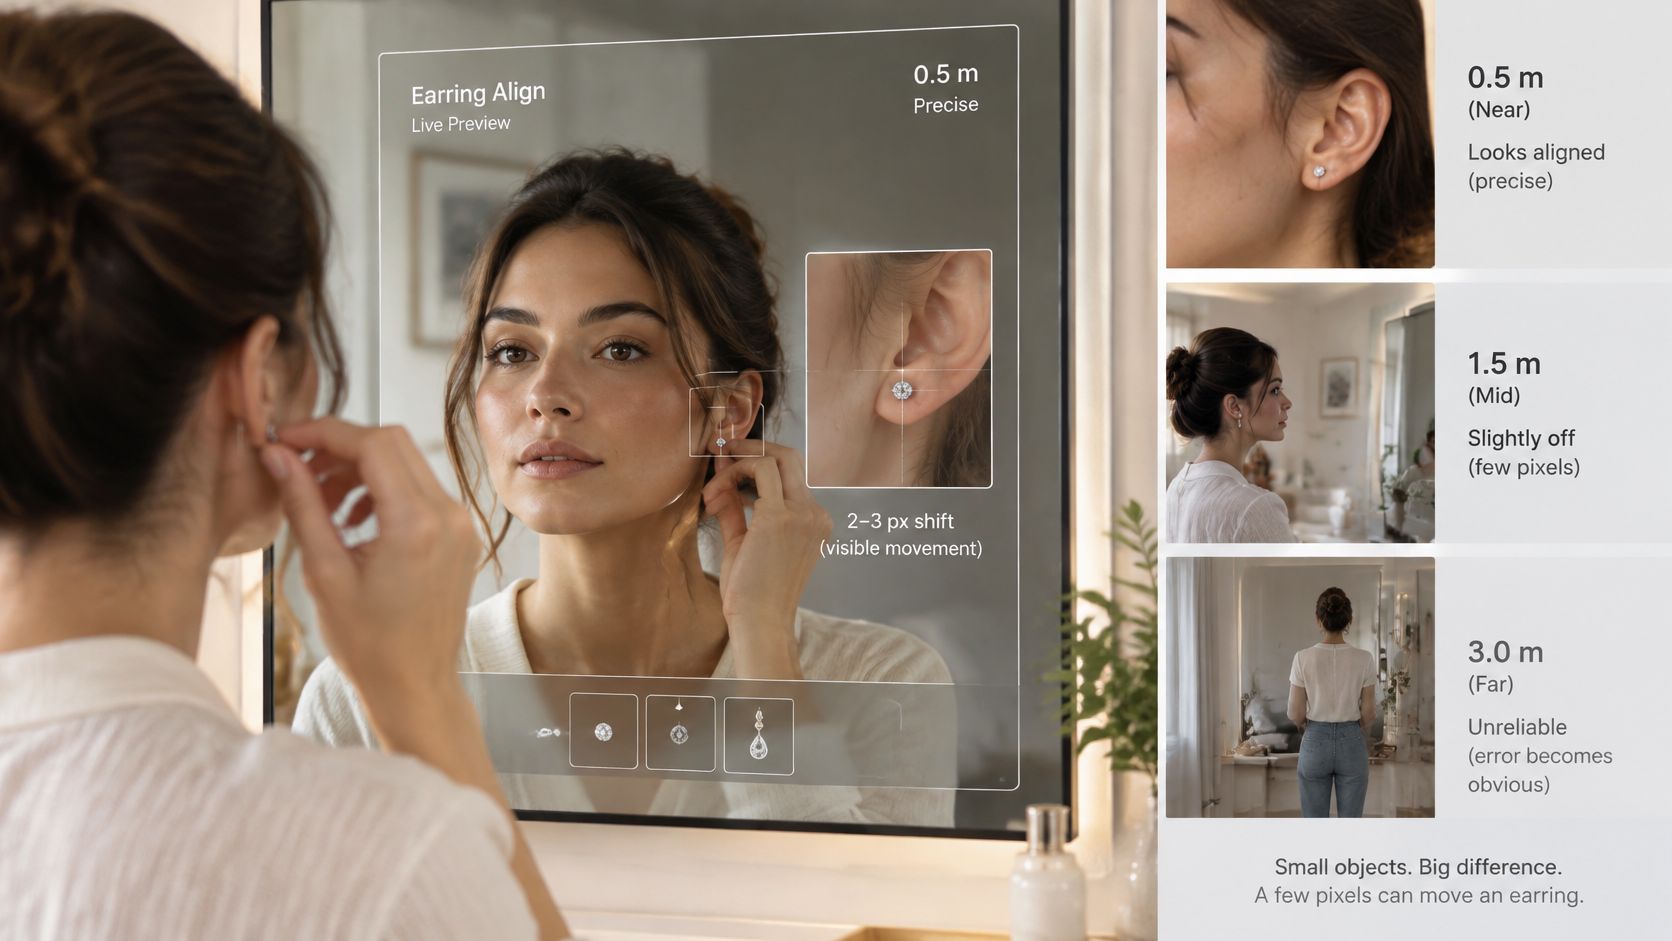
Distance gives you the clearest limit. An evaluated virtual try-on platform reported in WSCG 2024 proceedings found complete-face recognition was reliable within approximately 2 meters, became progressively less stable from 2 to 4 meters, and failed beyond 4 meters.
| Distance from camera | Face recognition | Effect on earrings |
|---|---|---|
| Within about 2 m | Reliable | Ear anchor and size stay stable |
| 2 to 4 m | Progressively less stable | Landmark jitter makes small earrings shimmer or drift |
| Beyond 4 m | Fails | No reliable ear anchor, so a fallback state is needed |
Within about 2 meters, the face fills enough of the frame for stable landmarks. This is normal phone distance, so most self-previews should start here. Between 2 and 4 meters, the system still finds a face, but the ear estimate wobbles. On a scarf that wobble is invisible. On a thin hoop it looks like shimmer.
Beyond 4 meters, there aren't enough pixels to anchor anything reliably. The correct behavior is a fallback state that pauses or warns, not a best guess that pins an earring somewhere near where an ear might be.
Angle, Hair and Light Shift the Result
A frontal or three-quarter view keeps at least one ear readable. Turn further and you're asking the system to anchor to an ear it can't see. Hair over the ear creates the same problem from the front.
Lighting matters just as much. Low or uneven light blurs the boundary between ear, hair and shadow. Reflective metal then adds bright highlights that move with tiny head turns. Long drops amplify every small geometric error because the far end of the piece travels the furthest when the pivot is slightly wrong.
Calibration sits underneath all of this. Believable size depends on camera geometry and perspective-aware scaling, not on centering a pretty asset near the cheek. If the system doesn't know how distance changes apparent size in that camera, it can't keep a hoop the same real size as you lean in.
The video below shows why guided framing helps before a shopper judges the result.
In practice, ask for a frontal or three-quarter view, enforce a minimum face size in the frame, reject excessive distance or steep rotation, and show a fallback when ear confidence drops. For photo-based generation, run the same checks on the source photo before export. It's cheaper to reject a bad capture than to publish a confident-looking mistake.
Size, Motion and Fit Are What Shoppers Need
Will this hoop look too large on my ear? That's the question shoppers bring to virtual try on earrings. A polished overlay often answers a different question instead. It shows that gold suits your skin tone, while leaving diameter, drop length and movement unproven.
The common assumption is that realism builds trust by itself. It doesn't. A Nielsen Norman Group usability study of augmented-reality shopping found realism and accurate placement strongly affected whether participants considered AR shopping useful, and one participant specifically rejected an earring tool because the item didn't track the ear accurately and looked cartoonish. Participants also wanted less clunky tools and more accurate sizing.
That finding matters because it separates two jobs. Looking plausible is one job. Measuring correctly is another.
What a Preview Can Show on Its Own
- Style and finish: Whether a pearl drop, gold hoop or crystal stud suits the outfit and occasion.
- Color against skin and hair: How warm metal, silver or colored stones read on that person.
- Rough proportion: Whether a piece looks delicate or bold against the face, assuming scale is calibrated.
- Placement: Where the piece sits on the lobe in the chosen view.
These are real benefits at the consideration stage. A shopper comparing three lengths can narrow the choice without guessing from a white-background photo. She just shouldn't treat that shortlist as a final fit test.
What Needs Product Data Behind It
- Real millimetre size: Hoop diameter, stud width and drop length measured from the attachment point.
- Motion: How far a drop swings when the head turns, and whether the preview models that movement at all.
- Weight and comfort: How the piece feels after hours, which no image can show.
- Post and clasp fit: Post thickness, closure type and security on a specific piercing.
- Ear anatomy: Lobe thickness, piercing position and whether a clip or hoop sits correctly on that ear.
An attractive image can still mislead if it doesn't disclose whether dimensions are to scale or whether motion is modeled. Say a drop is rendered from the center of its product photo instead of its hook. It may look elegant in a still frame, yet read several millimetres shorter than the piece that arrives. The shopper didn't misjudge. The preview never gave her a measurement to judge.
Treat virtual try-on as a style and proportion aid, not proof of comfort, weight, security or piercing compatibility. Pair every preview with millimetre dimensions, a size reference next to an ear outline, and a plain statement about scale and motion. That combination lets the shopper use her eyes for style and the numbers for fit.
How to Prepare Accurate Earring Assets
Good try-on results start before any generation happens. You're building a small data record for each earring, not just uploading a pretty picture. The steps below take longer than a bulk upload, but they prevent the faults shoppers notice first.
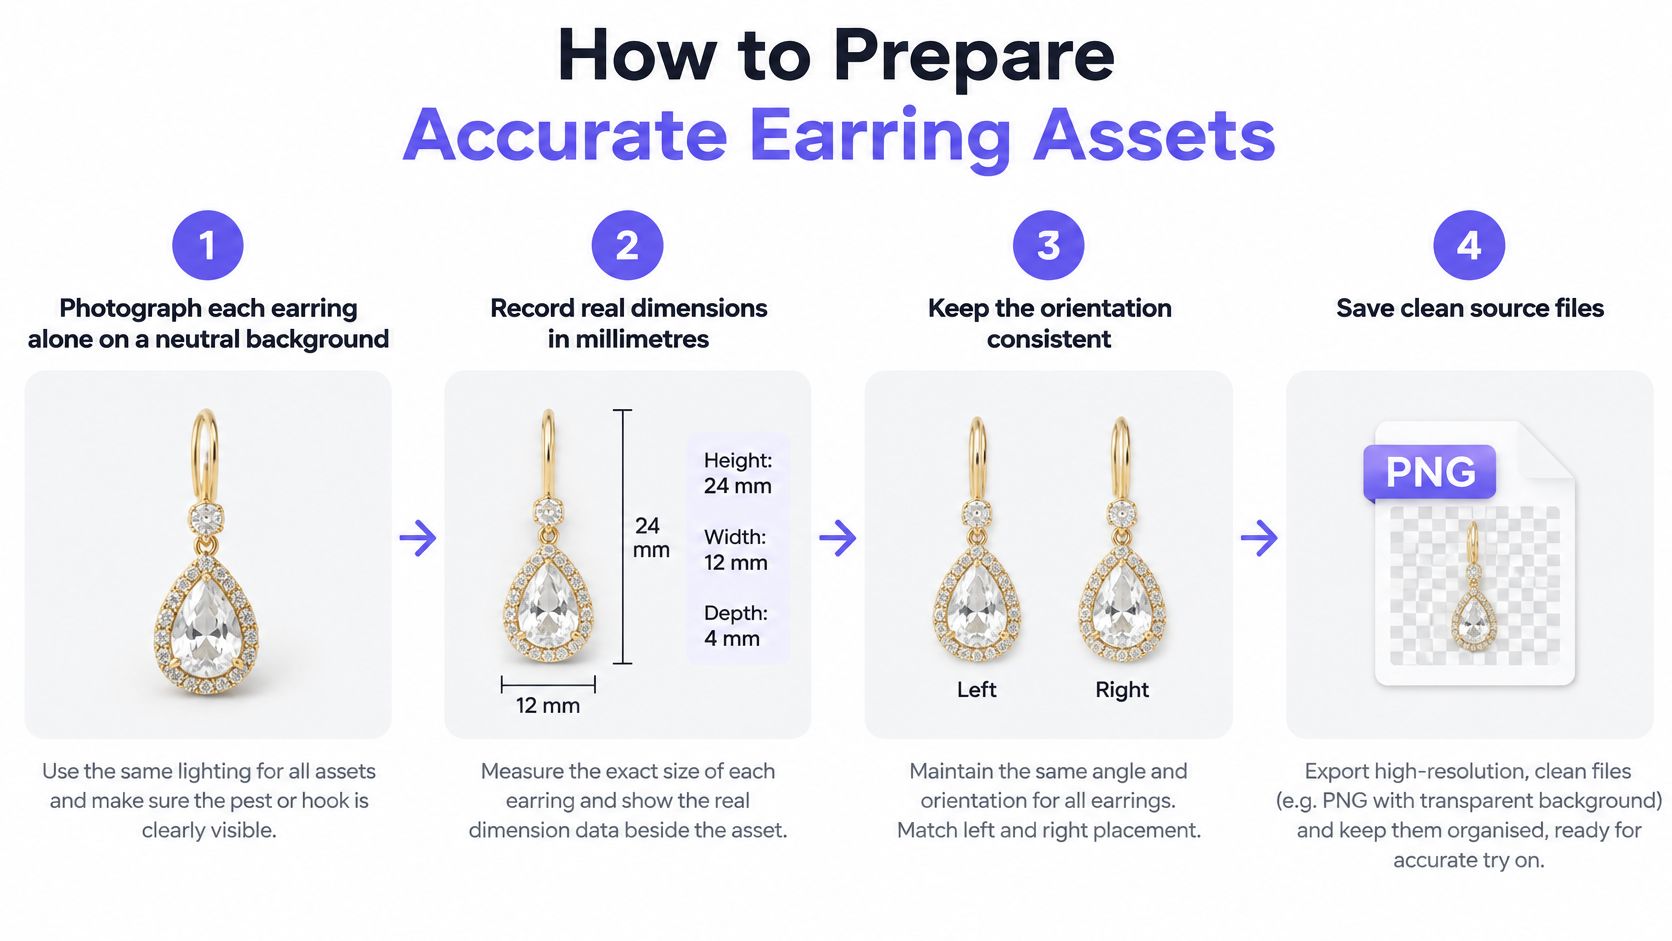
- Photograph each earring alone on a neutral background. Use consistent lighting and keep the post, hook or clasp visible. The common slip is shooting a pair at an angle for drama, which hides the attachment point the anchor depends on.
- Record real dimensions in millimetres. Note hoop diameter, drop length from the attachment point, stud width, post thickness and total weight. If you guess scale from the frame, the earring will look right in one crop and wrong in the next.
- Tag the attachment style. Label each asset as stud, hoop, drop or clip. This tag tells the system which origin and movement pattern to apply, so don't leave a drop tagged as a generic earring.
- Set the pivot at the attachment position. Place it on the post or hook, not at the center of the image. A centered pivot is the fastest way to make a stud float and a drop rotate like a sign in wind.
The pivot must match the attachment point. If those two points differ by a few millimetres in the asset, they'll differ on every face the asset touches.
- Remove source images that contain a model's face. If a garment image includes a visible face, we flag it because it can confuse virtual try-on and lead to inconsistent results, and you can use Extract (AI) to find better options. For earrings, extract a clean standalone candidate instead of cropping a face out by eye.
- Add occlusion and depth notes. Mark pieces that should pass behind hair, sit against the neck, or disappear at a profile turn. The slip here is assuming every earring should always render on top. Real ears don't work that way.
- Test on three face angles at a realistic distance. Check a frontal view, a three-quarter view, and a near-profile view with the face framed as a shopper would frame it. Compare the rendered size against the face with your recorded dimensions. A hoop listed at a given diameter should not read as two different products across the three angles.
If your source photos need cleaning before tagging, follow a consistent workflow for how to edit product photos so lighting and backgrounds don't change between left and right pieces. Keep orientation consistent for pairs, and save the clean source file beside its measurements so nobody re-derives scale from a screenshot later.
A correct test result looks boring in the best way. The stud stays on the lobe. The hoop hangs from the piercing at the recorded diameter. The drop starts at the hook and ends where its length says it should. Nothing shows through hair, and nothing changes size because the head moved a little closer. When you can say that for three angles, the asset is ready.
Common Try-On Problems and How to Fix Them
Most failures aren't mysterious. The most common one is the floating earring. It sits beside the lobe, close enough to look intentional in a thumbnail and wrong the moment you zoom in. That usually means the anchor was set to the face center or the image center. Reset the pivot to the post or hook position and the piece lands where it should.
The oversized hoop comes next. Someone scaled the asset until it looked right in one frame, without recording its diameter in millimetres. It'll look right at exactly one distance and wrong everywhere else. Scale from calibrated dimensions and show a size reference with the preview, so the shopper can check the image against a number.
A drop that doesn't swing tells a quieter lie. The preview is static, but nothing says so, so the shopper assumes stillness means the piece sits still. Either add motion settings with the correct pivot, or disclose plainly that the preview doesn't model movement.
| Symptom | Likely cause | Fix |
|---|---|---|
| Earring floats beside the lobe | Anchor set to face centre, not attachment point | Reset pivot to the post or hook position |
| Hoop looks too large | Diameter not recorded in millimetres, scale guessed from the frame | Scale from calibrated dimensions and show a size reference |
| Drop does not swing with head movement | No motion or depth data for the asset | Disclose a static preview or add motion settings |
| Earring shows through hair | Occlusion not modelled | Add an occlusion mask or flag the piece as partly hidden |
| Earring shimmers or flickers | Landmark jitter from distance or low light | Request a closer, well-lit frontal view and use the fallback state |
| Earring looks cartoonish | Low-resolution asset or lighting that does not match the face | Use a high-resolution asset and match the lighting |
Shimmer and show-through usually aren't asset defects at all. They're capture and depth problems. Ask for a closer, well-lit frontal view, add an occlusion mask, and let the fallback state appear when confidence drops. Don't smooth over a lost ear with a firmer guess.
Sort your fixes before you schedule work. Single-adjustment fixes include resetting a pivot, correcting scale from dimensions you already have, adding a disclosure line, and tightening capture guidance. New-shoot fixes include a hidden post or hook, a low-resolution source, mismatched lighting baked into the photo, and any image where a model's face contaminates the product. Don't spend a reshoot budget on a pivot problem, and don't try to pivot your way out of a bad source photo.
Confirm Your Try-On Setup Before You Launch
Publishing is a decision, not a default. Before virtual try on earrings reaches a product page, run three checks for a setup like virtual fitting room software. Each one protects a different part of trust.

- Rights check: Confirm you hold rights to every person, earring, brand element and source image. Our images can be used for ecommerce, catalog and social media workflows, including product pages, campaign tests, ads and social posts, as long as you have the rights to the uploaded people, garments, brands and source images.
- Earring data check: Confirm millimetre dimensions, attachment style, pivot position and a clean standalone image for every piece in the launch set.
- Disclosure check: State whether the preview is to scale, whether motion is modeled, and that it doesn't show comfort, weight or piercing fit.
Our workflow itself runs in three steps. You add a person by uploading up to 3 photos or capturing from camera, add clothes by pasting a product URL or using in-app search, then generate and edit by combining a person with up to 7 garments. For an earring launch, keep the accessory set small at first so you can inspect each anchor and measurement closely.
Pilot one collection with the disclosure line visible. Check how shoppers respond to the size reference and whether returns questions change. If the pilot holds up across frontal and three-quarter views, roll the same asset standard out to the full catalogue.
Build your earring previews on measured assets, honest scale disclosures and clean person photos, then generate consistent product and campaign images in one workspace. Visit Vtry AI to start with one collection, check the try-on across three angles, and publish only the previews you'd trust with a ruler beside them.